For our back garden, we have opted for something in between these two extremes: some existing structures remain, but there is a reasonable amount of earth working in the middle of the current lawn to make for better water flows and passive water capture.
One of my 'things' is passive water capture. By this I mean taking runoff from nearby hard surfaces (paths, driveways, paved areas, roofs) and directing this into parts of the garden that need it. That way, we make effective use of free rainfall and reduce (or eliminate entirely) our use of tap for watering - it costs money after all, and chlorinated tap water isn't even that good for the garden anyway.
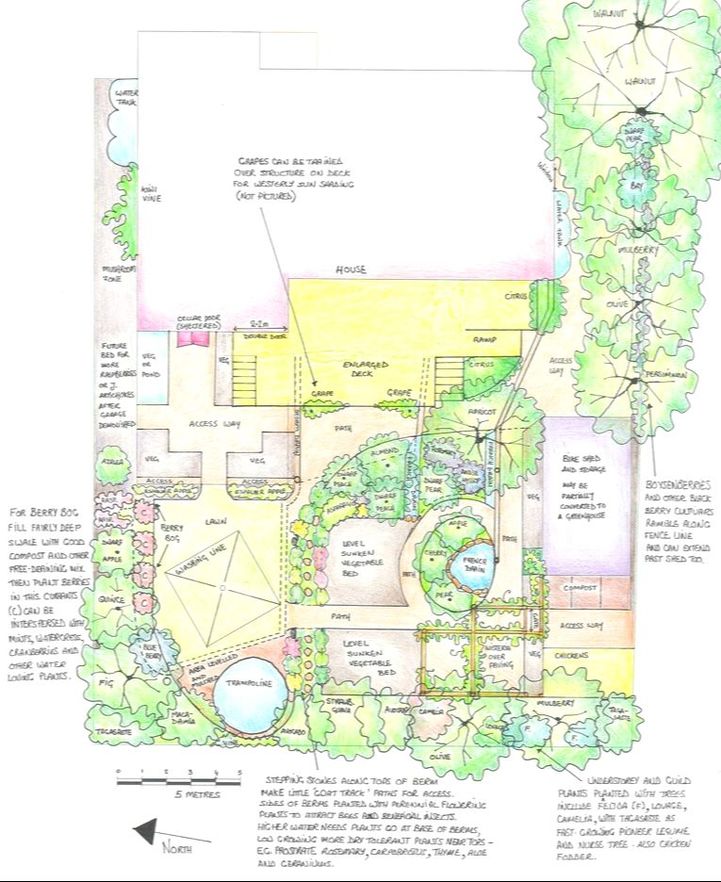
The design below is built on passive water harvesting, using a series of drains cut into the existing driveway (the slope runs downhill from right to left as you look at the picture) that direct runoff from the driveway into different garden beds. The dotted lines show the extent of the drains beneath the extended deck. Roof runoff will be diverted into rainwater tanks, and any overflow from these will then join this system. The garden beds are also contoured to maximise water harvesting - I'll cover this in more detail later in this post when I describe the earthworks plan that underpins this design.
The plantings are arranged to strike a balance between annual crop production (my partner is very keen we grow enough tomatoes to enable him to preserve a year's supply of tomato pasta sauce) and perennial mixed plantings in permaculture-style guilds. The shape of the main beds was determined by the oval bed containing French drain (final destination for water harvested in right hand drainage channel along driveway), two apple trees and a cherry. This feature was already in the garden, complete with a hard-to-remove concrete wall around it, so we opted to keep it.
The chickens are placed on the high side of the slope, to keep them and their coop dry. Sited along a north facing wall means winter warmth, while the mulberry provides summer shade and tasty fruit. Tagasaste, a fast growing nitrogen fixing pioneer tree is used for quick screening as well as fodder and mulch production. As the other trees get bigger, the tagasaste might be cut back hard or removed - it's purpose is to get things going rather than being a permanent feature.
Placing chickens next to the compost bays also means they can be put to use in composting - not only because their manure and bedding is very nutritious, but because chickens can actually help manage compost heaps. Chickens scratching through the heaps looking for grubs, worms and fungi aerate and turn the compost.
Raised vegetable beds along the north side of the coop and north side of the bike shed/greenhouse (labelled 'veg') in the design are actually wicking beds. For the one along the chicken coop, this provides extra protection from our noisy, excitable kelpies.
We already have a large wisteria growing on the north side of the shed, with the most gorgeous spring flowers. To make a feature of this, we can train it over a pergola structure over a paved area on the north side of the chickens. This paved area will also double as a water harvesting zone for the sunken vegetable bed to its left in the picture, and be a nice sunny sitting area in winter.
Closer to the house we plan to enlarge our current deck to make it easier to use (currently it's too narrow to sit at a table on it). Because it faces west, we will train a couple of grapes over a pergola structure to provide some westerly shade. Making use of the thermal mass in the concrete driveway, we can plant frost-sensitive citrus next to the deck - which also makes nipping outside to grab a lemon or lime during cooking easy.
Although not pictured, we already have a lot of culinary herbs in pots on the deck. Keeping high use plants such as herbs and salad or garnish ingredients very close to the house is part of the permaculture principle of zoning - high use plants should be as close and easy to access as possible. My rule of thumb is if I can nip outside and harvest something in my socks during cooking then it's close enough!
Lastly, the square area to the left of the deck with some more veg beds (these will also be raised wicking beds here) is where the current garage is. We plan to remove the garage in a year or two. Rather than trying to dig up the concrete floor of the garage, we're making use of it as a level base for raised wicking beds, as well as another hard surface to harvest water from and redirect it into the rest of the garden.
Earthworks
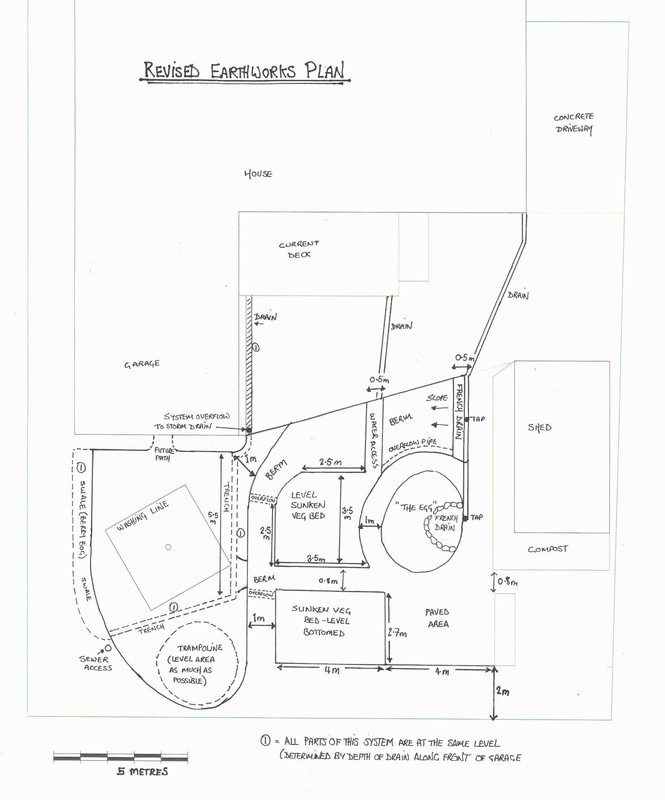
It's impossible to fit everything into one design drawing and there are many individual details left off the one above to keep it clear enough to read. Because there are substantial earthworks needed for our garden, I drew a separate earthworks plan:
The nature of the slope means that no water runs off the driveway towards the lawn or any other garden beds - it all lands in the storm drain system. The driveway takes up a substantial amount of space, which means there's quite a lot of runoff.
As I noted above, we plan to remove the garage over the coming year or two. In the meantime, there is no reason we can't start harvesting some of the water that flows down the driveway when it rains. To do this, we need to saw some drainage channels at useful points up the driveway to get some of this water to flow into the garden - not an insignificant job as it's reinforced concrete! However, one significant effort at the beginning will save countless hours of watering later on, and so we believe it will be well worth it in the long run.
A second issue is that the garden slopes a little towards the driveway, meaning that the harvested water won't flow uphill across the garden without some re-contouring of the slope. That's where we have decided to bring in a digger for a day to dig out two sunken garden beds (sometimes called rain gardens) that will be used to grow annual crops. The one nearer to the driveway will be low enough to act as a soakaway for water from the driveway.
Having a paved area to the south of the second sunken vegetable bed (near the bottom of the above picture) means that runoff can flow from this into the bed. Being approximately the same size and the bed, this effectively doubles the amount of rainwater getting to that garden bed. For Canberra's average rainfall of around 630 mm, this means this bed will receive over 1200 mm per year of rain alone - quite a difference!
With any water capturing system it's important to incorporate overflows to avoid flooding when there is too much water for the ground to absorb. Both of the sunken beds in the middle of the picture include overflow culverts to be incorporated into the berms (mounds) to the north of the beds. These will drain into the second, lower water harvesting system around the lawn.
The second system takes any water that makes it down the driveway to the channel along the front of the garage and directs this around the lawn to the berry bog along the northern edge of the lawn. I've been hand digging the berry bog, but we'll probably get a trencher in to do the channels through the lawn. These will be lined with landscape fabric, filled with coarse aggregate and contain a bit of slotted agricultural pipe to ensure water can access the whole system without any potential blockages. Along the top we'll probably put a line of bricks at the same level as the lawn to make a nice border as well as enable easy access should we need to do any maintenance in the future.
The system as a whole has an emergency overflow - back into the storm drain entry point in the drain in front of the garage - in case the system gets too saturated. This will be set at a higher level than now, but low enough to ensure that the berry bog doesn't get flooded!
Finally, in case you're wondering what a French drain is - it's simply a lined, gravel filled trench, designed to allow water to soak in. It can be a great way to get water to tree roots (if you can dig one deep enough). Filling it with stones and having an attractive top layer of gravel means it can double as a path.
So - we've finally booked the excavator for next Tuesday... will update with further blogs on how we go with implementing the design!


 RSS Feed